Showing posts with label accounting. Show all posts

Friday, October 26, 2012

Shortcut Keys in Accpac


The computer mouse simplifies the way you navigate through a computer screen by pointing and clicking on the screen. However, as using your mouse is not necessarily the most efficient way to select and open items on your screen. Sage Accpac ERP simplifies the data entry task by incorporating this feature.
In Sage ERP (Accpac), there are a handful of useful shortcut keys that you can use to save time to navigate through the screens. To see how the shortcut keys can be used in Sage Accpac ERP, let us use the O/E Order Entry screen as an example.
You can use the following shortcut keys to navigate through the orders:
o  Page UpGo to the first (top) record in a list.
o  Page DownGo to the last (bottom) record in a list.
o  Ctrl/Page Up - Go to the first record in a Finder list.
o  Ctrl/Page DownGo to the last record in a Finder list.


Now let us see how shortcut keys can be used in the Order Detail grid highlighted in red:
o  Ctrl/TabMove out of a grid or list to the button or field following the grid or list.
o  Ctrl/Shift/TabMove out of a grid or list to the button or field directly above the grid or list.
o  HomeGo to the first entry in a list.
o  End Go to the last entry in a list.
o  Up Arrow/Down ArrowGo up or down one line in a grid.
o  Tab or EnterGo to the next column.
o  SHIFT + TAB or SHIFT + ENTERGo the previous column.
o  F9 – If you select any of the line items and press this key, you can drill down on the line item.


o   F5 - If you have the cursor inserted in any field that has a Finder icon (the one with the magnifying glass icon), you can activate the Finder search function by pressing the F5 key.

o   CCalculator – If you select any of the columns related to quantity, amount and press Shift+ key, a calculator appears where the required calculations can be done.


o   Tab Key – The tab key can be used to navigate from one tab to another.

o   Navigation Keys – There are following four navigation keys in Accpac:

First, Previous, Next and Last
First: To go to the first record from the finder list
Previous: To go to the Previous record from the finder list
Next: To go to the Next record from the finder list
Last: To go to the Last record from the finder list


CREATE RECURRING ENTRIES IN GL


Recurring Entries in GL is used to set up journal entries for transactions that occur on a periodic basis. Setting up a recurring entry is similar to recording a journal entry, except that the Recurring Entry form contains additional fields for identification.

To Setup Recurring Entries:
1.       In the GL Setup folder, click Recurring Entries icon
2.       In the entry screen, enter the unique recurring entry code which should represent the type of entry created; maximum 16 characters.
3.       In the Entry description field, enter the suitable description e.g. ‘Recurring batch for Nov 2012 Salary Liability.’
4.       In the schedule field, select the schedule an appropriate schedule such as Monthly.
The scheduling defines the frequency and the day on which the recurring transactions will be         processed.
5.       In the start date field, enter the first processing date for the entry e.g. ‘10/19/2012’.
6.       In the Expiration type, there are two options:
1.       No Expiration date
2.       Specific date
If you select Specific date, you must specify an expiration date in the field that appears.
When an expiration date is specified, the entry is included in the recurring entry batch only if the expiration date is later than the run date.
7.       The Last Run Date field displays the last date this entry was included in the recurring batch.
8.       The Last maintained field displays the last date when this record was changed.
9.       In the description, enter the description for the recurring entry e.g. ‘Recurring batch for Nov 2012 Salary Liability for Greytrix Employees.’
10.   Complete the remaining fields the same way a typical journal entry is created.
Create Recurring Entries Batch:
Select the Create Recurring Entries Batch icon from GL Periodic Processing. The Create Recurring Entries Batch form appears:

1.       Enter a date in the Run Date field if the recurring entries are being created manually in the Create Recurring Entries Batch form. The run date determines which recurring entries are due to be processed. It includes all entries up to the date specified.
2.       Enter the From and To Recurring Entry Codes. For e.g. ‘If a new batch is to be created for salary to Greytrix employees for the month of November, then the code that is already created as a recurring entry for the monthly salary should be selected in the From and To criteria.’
3.       The selection criteria Method has the following three options:
1.       Default - When this method is selected, the batch will be appended to an open batch if both batches have the same run date; otherwise, a new batch is created.
2.       Create a new batch – When this method is selected, a new batch is created.
3.       Add to an existing batch - When this method is selected, a Finder field appears. Click the Finder to select an existing open batch to add this batch to
4.       Run Process.

After creating a recurring entry batch:
• Print the Batch Listing and, if necessary, edit the batch using the Journal Entry form.
• Post the recurring entry batch.
                                                                                                                                                      

Thursday, October 11, 2012

Exporting Data to Excel


The best approach to work with Export in Accpac is by entering a sample transaction directly via the user interface (UI) and then exporting it using Accpac Export in the format you require, such as Excel or CSV or ODBC. The exported file can then be used to prepare your data for import.
Data can be exported for all the masters, setups.
To Export the data from Accpac go to the required screen and following path:
File optionsà Export


Once clicked on Export, it will open a new screen where the user has to select the type of file format in which data should be exported.

Also select the File Location path where the exported file will be saved. Once the path is selected, it displays the various detail sheets that will be exported.

There are several features available while exporting the data as mentioned below:
Ø  The user can export only required columns in the sheet by selecting them. This would help to reduce the file size.


Ø  There is a Set Criteria feature, where the user can set the various criteria’s for export
For Ex, If the user wants to export only some specific data from the system say, if there are Stock and non stock items imported in the system but if it is required to export only the stock item, then click Set criteria, select stock item column from columns dropdown, click on Add, it will be added in the field criteria column, click on the first cell, a dropdown will appear, select Yes from dropdown, click Ok and export. This would export only the stock items in the sheet.
The same procedure applies for other column criteria.

Ø  There is a Save Script option which allows saving the Set criteria script at a specific location, so that the next time when the user wants to export the sheet with the same set criteria, the script can be loaded from the path where it was saved using the Load Script button.


Friday, July 13, 2012

New release of Greytrix Document Attachment for Sage 300 ERP


We are glad to announce new release (with a complete makeover) of our Greytrix Document Attachment solution for Sage (Accpac) 300 ERP v5.6 & 6.0.
Lets see its features and whats new.
Product Features:
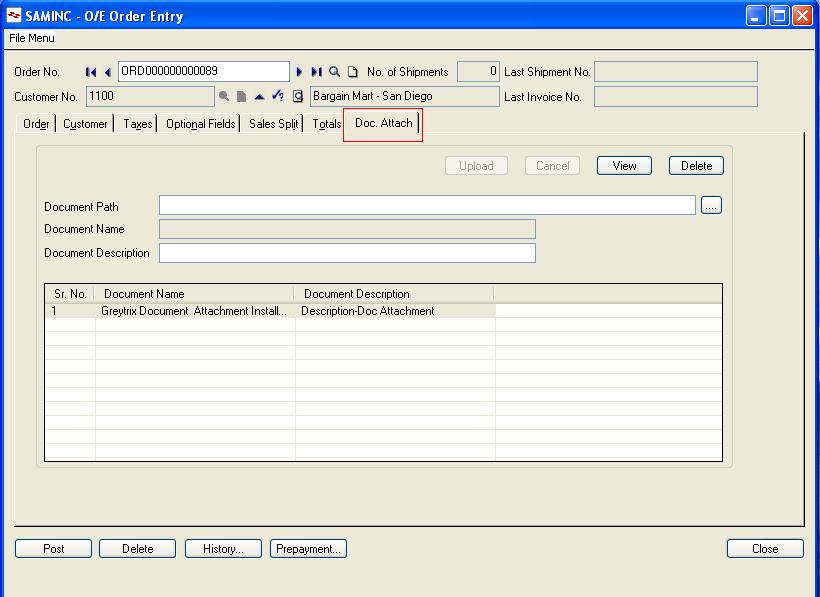
* Allows you to attach scanned documents/reports/Fax/images to almost all the transaction screens in Accpac like Order Entry/ AR Invoices/ AP Invoice/ Purchase Order/ PO Invoice/ Adjustments/GL Transactions.
* Using this product  user can now keep a track of Original Sales Orders/ Purchase Orders/ Amendments done to the  Orders/ Revised Orders
* Using this product user can attach documents to the AP/AR Adjustment Entries which have been passed and posted with a manual approval of an authorized person on Paper.
* Below is the screen shot of O/E Order Entry screen with document attachment tab, where user has selected one text file .
Document attachment functionality is provided on the following screens. [Can be added to others if needed]
  • AP – Invoice Entry, Adjustment Entry, Payment Entry
  • AR – Invoice Entry, Receipt Entry, Adjustment Entry
  • GL – Journal Entry
  • OE – Invoice Entry, Order Entry
  • PO – Invoice Entry, PO Order Entry
Now lets see Whats New
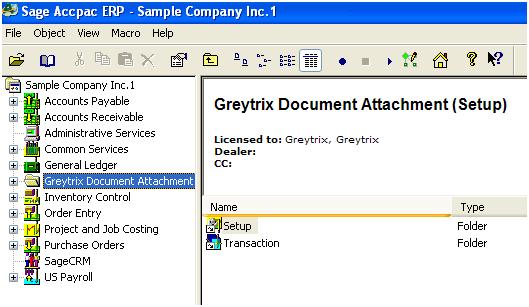
1. This version of Document Attachment product is now released as a Module (registered with Sage), so that standard Accpac transaction UI is not disturbed and patch updates don’t affect the product and the system. It is compatible with Sage (Accpac) 300 ERP v5.6 and 6.0.
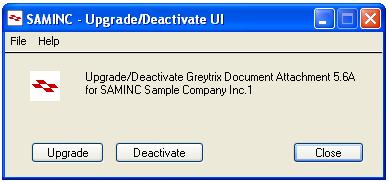
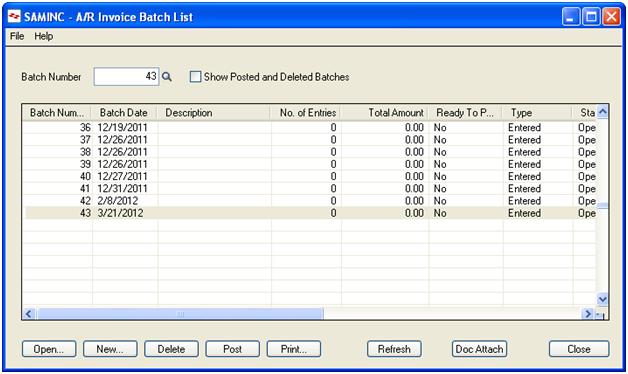
2. Ability to activate or deactivate Doc Attach module per company. (As shown in below screen shot)
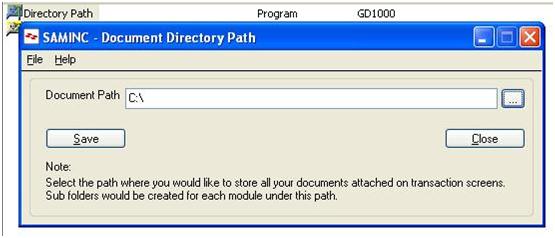
3. Now you can configure UNC filename path in the new Setup Screen and no need to maintain Document Attachment.ini file. (refer the screen shot)
4. Doc. Attach functionality extended on following screens [Can be added to others if needed]
  • AP – Invoice Batch List, Adjustment Batch List, Payment Batch List
  • AR – Invoice Batch List, Receipt Batch List, Adjustment Batch List
  • GL – Batch List
  • OE – Shipment Entry
  • PO – Receipt Entry
5. You can now attach documents to historic transactions in Accpac (already posted transactions).

Friday, June 8, 2012

Customer Number Change in Sage 300 ERP

Greytrix has under its brand “GUMU” developed migration utilities which assist in migration of data to Sage ERP and Sage CRM solutions. Today, we will discuss about our Sage Certified migration solution for Sage (Accpac) 300 ERP.
Currently we migrate at FIXED COST :-
* Complete History To Sage (Accpac) 300 ERP from QuickBooks, Peachtree, Simply Accounting, Great Plains and Sage Pro ERP
* Open and Masters To Sage (Accpac) 300  from Sage (MAS 90/200) 100 ERP, MYOB and Sage BusinessWorks
As a part of our migration process we ask users to fill in a mapping sheet excel with details of how they would like their current accounting system accounts to be mapped to Sage (Accpac) 300 ERP. Sometimes, it happens that the client later realizes that one of the data of customer code was wrongly provided by him for e.g. As per mapping sheet we had assigned  code  ‘1200’ to customer ‘Mr Ronald Black’ which was supposed to be as ‘1201’. Now we cannot delete the Customer and create it again in accpac since there are transactions migrated against it.
To overcome such issues, Sage 300 has introduced a utility named ‘Customer Number Change’ under AR module. It Changes the Customer Numbers quickly and all information, including Customer balances, history and transactions will be associated with the new Number in all modules of accpac i.e. Accounts Receivable, Inventory Control, Order Entry, Purchase Orders, Project and Job Costing, Tax Services, and Bank Services wherever it has been used.
For Activating the ‘Customer Number Change’ utility login to Accpac and go to Administrative services -> Data Activation. You will notice a utility with this name in the list of applications available. After activation you will find this application under AR module.
Through this utility we can Change, Combine or Copy the customer number.
As a solution for above case we would discuss ‘Change’ option. You need to follow the below steps:
1. Go to Accounts Receivable >> Customer Number Change>> Customer Number Change
2. Click on new button; a new Action window will appear with options change, combine and copy. Choose the radio button ‘Change’ under Action box, if that is not selected by default.
3. Then select the customer number under change box. You need to first input the customer number which is existing in Sage 300. You can either:
a. Type the existing Customer Number in the Customer Number field;
b. or Use the Up and Down Arrow keys to activate and browse through the Customer Numbers list or choose the List Button then select the Customer Number.
4. Once the Customer Number has been chosen, the corresponding Short name and Customer Name are displayed in the appropriate fields. Next
a) In ‘To’ box, enter the new Customer Number. But make sure that, new customer code should exist in Sage 300.
b) Also in ‘To’ box, change the displayed Short Name and Customer Name fields if required.
5. Choose OK button to add this entry to the Change List. Choose Cancel to discard the current change entry or click on Post Button.
6. Once you click on Post, it will start changing code of Customer into AR module as well as all other modules of accpac wherever this customer has been used.
This way we can correct the customer codes using Customer Number Change Utility without doing any harm to customers Transactions and master information.
In our next blog we will discuss about how customer numbers can be merged in Sage (Accpac) 300 ERP.


GL Control Account Feature in Sage 300 ERP


We come across requests that are sometimes so straight forward and some really need you to be a cracker and maybe that’s why we love Sage (Accpac) 300 ERP which makes our life simpler.
Suppose there are 2 different users wherein one user does the AP Invoice entries while the other user performs operations on AR entries. There is a possibility of accidentally selecting an account which is to be used for AP entries. Hence to avoid such mistakes, we were looking for a feature in Accpac which will restrict the user from using the Accounts which are meant for the AP Transactions.
As far as Accpac is concerned we can definitely restrict the users from avoiding this mistake using control Account feature which is inbuilt in GL module of Accpac. Let us see how it works and how it can ensure your accounts are in order.
Consider, we have a GL account which is being used for our bank account and this account should be affected only by AP transactions [by vendor] and not by any of other modules. In such case we will follow below procedure:
  • Open the GL Account screen and select the GL Account which has been set as bank Account. On the detail tab we will check the option Control Account, the new tab as Subledger gets added on the screen as shown in below screenshot.

  •   Go to Subledger tab and choose the subledgers which will have a control on this account. Here we are adding AP source codes as sub ledgers as shown in below screenshot.


Now let’s check the same by doing a normal GL Entry from GL Module on this account. For this go to GL Transactions>>GL Entry and select source code as GL-JE and add select the Account 1020 for Transaction entry. As we select this account for entry, a pop-up screen appears as shown in below screenshot. It will restrict us to make GL entry by another source code which has not been set as subledger on in GL Account screen.


It will accept GL transactions only created by AR Receipt and AP payment Transactions as set against the account sub ledger. If we want to allow account to get affected by other transactions also then we need to add  Source codes of those respective transactions into subledger of GL Account. The transactions created by only those subledgers may be posted to the account. General Ledger checks the ledger by looking at the first two characters prefixed on the source code for each sub ledger Transaction. These first two characters must match the subledger codes.  For example, all transactions created by Accounts Payable use source codes that begin with AP.


This way we can avoid user’s repetitive mistakes which would have been difficult for the admin to keep a hold.


Saturday, May 19, 2012

How to resolve: Error Code: 711


Many of our TDS clients face this issue while opening the AP Invoice/Payments Screen, below is the message popped up.
 “Error code: 711 Invalid class string. Looking for object with ProgID ” (refer below screen shot for error).


We have arrived at some conclusions regarding this cause of the issue as listed below:
  • The respective file is not registered in the registry OR
  • User may do not have the sufficient rights to use the AP module

To solve this error you need to do the following steps:
  1. Close the Accpac, if it is in running mode.
  2. Examine the user right for Sage Accpac folder, if not defined then please give the rights to the user.
  3. If the operating system is window 7/window vista then make user as a power user. 
  4. Execute the RegAcc.exe as administrator [you will find this in sage Accpac installable folder i.e. C:\Program Files\Sage Software\Sage Accpac\Runtime]

 Hope this helps!

Friday, May 4, 2012

Adding Additional Costs to Inventory When They Are Not Known At Time of Receipt in Accpac:


It is often identified that custom clearing agents or freight and insurance handlers do not bill the charges at the time of delivery of goods but send an accumulated bill on a monthly basis and then it becomes a headache for company to prorate it to inventory that is already shipped or consumed.
Then the company is left with following alternatives:
1.       To not to prorate the cost to inventory and directly add it to Cost of Sales at the end of year, hence compromising the costing effect.
2.       Wait for making the stock receipt till the time we receive a bill from vendor, which is not very practical.  To struggle and convince the vendor to send bills at the time of delivery, which your vendor might not agree to do.
Another alternative is to create a provisional vendor in Accpac Accounts Payable module for the purpose of prorating an approximation of additional costs on Inventory and then adjust the costs when the actual ones are known.
Let’s see in detail how this is accomplished:
Firstly we need to create a Provisional Cost Vendor Group and Account Set and Vendor in Accounts Payable module where the account set will link it to an account in General Ledger for Provisional Cost Vendor. Now go ahead and create the receipt selecting Provisional Cost Vendor (Let’s name him PR01) PR01 and put in the approximation of additional costs which is generally known to Accounts Team by experience. Then the respective Invoices against Material vendor and Provisional Cost Vendor shall be made.

Dr
Cr
Inventory
100

Material Vendor

100
Inventory
30

Provisional Cost Vendor (PR01)

30

Next, when the actual invoice is received from your Additional Cost vendor, book it on the name of vendor (Let’s name him AD01) AD01 in Accounts Payable Module as a summary type invoice, and select the GL created as ‘Provisional Cost Clearing A/c’ under Income Statement.


Dr
Cr
Provisional Cost Clearing A/C
40

Additional Cost Vendor (AD01)

40

Now to reduce the payable for Provisional Cost Vendor and increase the same for Additional Cost Vendor, pass a Credit Note/ Adjustment entry in Accounts Payable module while selecting the invoice created through PO Module and selecting the same ‘Provisional Cost Clearing’ account to be credited.


Dr
Cr
Provisional Cost Vendor (PR01)
30

Provisional Cost Clearing A/C

30

Finally to adjust the difference between approximate and actual additional cost, create a GL-JE debiting Provisional Cost Clearing and Crediting COGS or Cost Variance account.


Dr
Cr
COGS/ Cost Variance
10

Provisional Cost Clearing A/C

10

This way the inventory costs for each delivery can be identified and then added to COGS at the end of year.
Hope this helps ease your work.