Tuesday, December 25, 2012

Advanced Application Security in Sage 300 ERP

Whenever we  log in Sage 300 ERP, Accpac asks us to provide a password.


This is because of enabling application security option at the time of database setup.


This feature of Accpac provides an additional security at the time of login.


If we uncheck Enable application security option, Accpac won’t ask for password at the time of login.
  Advance security settings


Advance Security Settings of Accpac provide us various security options such as


1. Require complex passwords:

Enabling this option will ask combination of Alphabets, Numbers & Special character as password.

2. Require passwords to change:

Makes it mandatory for the user to change password in given number of days (a range between 1 to 999 days).

3. Require minimum password length:

Makes it mandatory to select a password having minimum length as specified here (a range between 4 to 64 characters.)

4. Lock out user:

Locks out user if the user makes 3 consecutive wrong attempts at password. Accpac will lock the user till ADMIN sets the respective user to Unlock.

We can set number of attempts before lock out between 1 to 999 times.

5. Enable locked out user:

This option will only enable if we check Lock out user option. We can unlock the locked out user automatically after a stipulated time period specified here, between a range of 1 to 30000 minutes.


6. Use time server:
Here you can specify which server needs to be connected to for referring to as system clock for calculating Lock Times.


Changing Properties for Menus/Objects in Sage 300 ERP

Sage Accpac provide features that allow to change the properties of objects for better look and feel and improve the efficiency

 
The use of the Properties Dialog Box is to change the Title, Icon for the selected object.
 
• To change the title for the object, type a new name in the Title field.
 
• To change the icon, click the Change Icon button. Then, in the Change Icon dialog box, select an icon and click OK, or click Browse to select another icon file, then select an icon and click OK.
 
• To provide access rights for particular object, Accpac provides All Users checkbox. If any new report is deployed, and it should be accessed by all the users, click on All Users.
 
• The Start Finder First Feature provides the finder when the screen is open. When we click on Order Entry screen it would first pop up and open the data in the finder.
 

Sometimes we may come across situations when we require to refer to the old order as a reference while     creating a new order, or it may happen that we are in a process of making an order, filling in Item details and we require to create another order on priority basis, which requires us to exit the unfinished order. Sage Accpac provides a Multiple Copy feature with which we can say Goodbye to all the above problems.

 
To get around this and open new screen for order at multiple instances, we need to go OE Module -> Order Entry Screen
 
Right click on Order Entry-> Properties. It would pop up a new window with a checkbox next to Start Multiple Copies which needs to be checked and clicked on OK.

While doing Order Entry, when we go to the order entry screen in OE Module, a single order entry window pops up where we can key in details. If the Order Entry screen is minimized and then the process is repeated in attempt to open the second Order Entry screen, Accpac opens the same screen instead of a new one.

 
Each time you click on Order Entry by selecting the Start Multiple Copies checkbox, a new window with unique multiple instances of Order Entry is created as follows:


At a Glance:

 
• Go to Order Entry -> OE Transactions
 
• Right Click on Order Entry Icon
 
• Select Properties
 
• Check the box label Start Multiple Copies. Click OK.
 
• Left click on Order Entry Icon as many times as unique instances of Order Entry is required.
 
 
In addition to this, Accpac also has user friendly quick access menus:
 
• Shortcut key to open a new company
 

·         Copy, Paste button to copy an existing screen and create a new.


·         Edit, Stop, Run Button to run macros

 
      ·     Sage Accpac Home Page


·         To view the Icons in Small, Large sizes.

 
      ·    To view the icons in List/ Detail format.


GL Security in Sage ERP 300

Sage 300 ERP has a predefined function of GL security which will help you to establish control over the GL segments and accounts at the GL level.


Before using this you have to make sure that you have ticked the option of ‘Use GL security’ in GL options. Once you tick the same you will get an icon for Account Permissions in GL accounts.


You can grant the permission to respective users at GL level based on the GL segments you define. Thus in a company where multiple locations are defined as GL segments you can use this functionality to make sure that appropriate users are accessing proper segments or locations.


You can select the user and assign access to them individualy which will make sure that the particular user does not have access to all other things which he is not intended too. Basically this helps in avoiding a situation where the user selects a wrong account and posts the entry.


Hiding Fields or Objects - User wise in Sage 300 ERP

In this blog we would be discussing one of the features of Sage 300 ERP, which allow you to Hide or disable any Button, Field, Tab or Any Text which is available on any sage ERP screen/form.
Sometime it happens or required that, you should not allow end user to access some details or information which is available on Sage 300 ERP screen/Form.
By using UI profile maintenance feature you can achieve this Requirement.
In below example you want to hide ‘on hold’ option from end user which is available in Sage 300 ERP on order entry screen.

 
1. Click on File Menu and select option customize                 
 
2. Assign a suggestive working profile name such as ‘HIDEONHOLD'

3. Un-tick on control from list of control of form


On Hold option is disabled from Screen


To assign Working profile to Sage 300 ERP user

1. Administrative service >> Assign UI Profiles


Order Entry Transaction Flow in Sage 300 ERP

Let’s see How O/E transaction flow works.

The Sales Order Module is designed to help you record, evaluate and improve customer service, sales and marketing activities. It is ideal for any company in the distribution, engineering, design or customize to order, repetitive or process environment.

The Sales Order Module maintains order history in terms of pricing and tax information, generates sales orders, manages picking, issuing, packing and shipping operations, and checks credit, which were used in past sales. The entire product, pricing and shipping information is edited during the sales order process.

In this below diagram we can see complete flow O/E transaction up to Bank Receipt

  1. Create O/E Entry
The sale Order Entry is an order issued by a business to a customer. A sales order may be for products and/or services

In Sage Accpac we can easily make O/E Entry for sale item against customer. We just have to select customer no, item code, order qty., location and ship to location. We can create price list and based on price list, it will automatically populate price for that item code. Once the order entry is completed, post the transaction. At the time of physical shipment of goods, create O/E shipment Entry against posted O/E entry.

We can see below screen shot of O/E Entry


2. Create O/E Shipment Entry

An O/E shipment Entry is a document, which shows that which item or product is being dispatched, to whom and where.
In Sage Accpac, we have to create O/E shipment entry against Posted O/E Entry.

We have to select order number and customer no, based on that system will automatically populate all data. For example item, item description, price list, qty. shipped, ship location etc. as shown below.

In sage Accpac we can make partial dispatch for some item or product or can make full dispatch.

After creation of O/E shipment Entry, we have to post the transaction.

3. Create O/E Invoice Entry

O/E Invoice is a documentary evidence of transaction sales. It enlists the summary of the transaction i.e. quantity, unit price, total price, date, customer details, item descriptions, settlement terms, dates etc.
In Sage Accpac we have to create O/E invoice entry against posted O/E shipment Entry.

We have to select shipment number and customer number, based on that system will automatically populate item code, item description, ship location, shipment date, qty. etc. being invoiced.
In Sage accpac we can create partial invoice against O/E shipment Entry. For example shipment is made for 2 qty. and we want to create invoice for 1 Qty., then we can create invoice for only 1 qty. by changing qty. invoiced.
After creation of O/E Invoice Entry, we have to post the transaction. Once the O/E Invoice is posted an A/R invoice batch is generated and posted referring to which we can create Receipt entry transaction.


OR

1. Create O/E Entry, O/E shipment Entry and O/E Invoice Entry by One Transaction.
In sage Accpac we can create O/E entry, O/E Shipment entry and O/E Invoice Entry by one single transaction.

After entering all data in O/E entry screen, we have to click on “ship all” button, then system will automatically display “create invoice” checkbox and we have to check it which is highlighted below.
So after posting the transaction, system will automatically create O/E shipment Entry and Invoice Entry.

We can see in below screen shot, after posting the transaction, system has automatically created O/E order, O/E shipment and O/E invoice.


Monday, December 24, 2012

Write-off Batches in Sage 300 ERP


We come across situations where Customer receipts have amounts shorter as compared to invoice amounts but the difference is too small to keep the invoice open.

The reasons to short close these invoices can be purely Customer Management related, now the question is how to configure these in systems?

Further to this, if there are more than 1 such documents and multiple number of such customers, then Knocking-off document-by- document will be very tedious and time consuming task

Therefore, Sage 300 has a feature where we can write-off a document in the terms of amount and percentage as per our requirement.

Let’s see this with help of example:

Suppose we have received the payment of INR 10000 from a customer against the invoice of INR 10002. And our management says for the sake of customer relation, we waive off this INR 2.

As we can see payment amount and invoice amount does not tally therefore,

We need to setup system for such kind of behavior otherwise; our book balances will not tally with the system balances.

This inconsistency can be overcome by using write-off batches functionality
We can write-off the documents depending on various types as mentioned below.

1. Outstanding Transaction.

2. Overdue Transaction

3. Overdue Balances

4. Outstanding Balances


There are several filtering criteria’s provided by the system such as you can execute the write off batch on a particular date, if you want you can use specific type of transactions to write-off, further to this you can select the documents based on the customer and customer groups. You can refer the below write off screen which is present in Accounts receivable->AR Periodic Processing->Create write off batches.
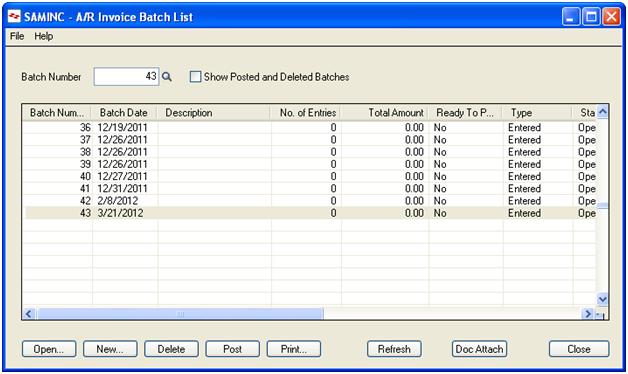
Once the batch is executed, system will create an un-posted entry in AR invoice batch list where it will Credit the customer on one side and will Debit the write off account defined in AR account set on other side.

Friday, October 26, 2012

Shortcut Keys in Accpac


The computer mouse simplifies the way you navigate through a computer screen by pointing and clicking on the screen. However, as using your mouse is not necessarily the most efficient way to select and open items on your screen. Sage Accpac ERP simplifies the data entry task by incorporating this feature.
In Sage ERP (Accpac), there are a handful of useful shortcut keys that you can use to save time to navigate through the screens. To see how the shortcut keys can be used in Sage Accpac ERP, let us use the O/E Order Entry screen as an example.
You can use the following shortcut keys to navigate through the orders:
o  Page UpGo to the first (top) record in a list.
o  Page DownGo to the last (bottom) record in a list.
o  Ctrl/Page Up - Go to the first record in a Finder list.
o  Ctrl/Page DownGo to the last record in a Finder list.


Now let us see how shortcut keys can be used in the Order Detail grid highlighted in red:
o  Ctrl/TabMove out of a grid or list to the button or field following the grid or list.
o  Ctrl/Shift/TabMove out of a grid or list to the button or field directly above the grid or list.
o  HomeGo to the first entry in a list.
o  End Go to the last entry in a list.
o  Up Arrow/Down ArrowGo up or down one line in a grid.
o  Tab or EnterGo to the next column.
o  SHIFT + TAB or SHIFT + ENTERGo the previous column.
o  F9 – If you select any of the line items and press this key, you can drill down on the line item.


o   F5 - If you have the cursor inserted in any field that has a Finder icon (the one with the magnifying glass icon), you can activate the Finder search function by pressing the F5 key.

o   CCalculator – If you select any of the columns related to quantity, amount and press Shift+ key, a calculator appears where the required calculations can be done.


o   Tab Key – The tab key can be used to navigate from one tab to another.

o   Navigation Keys – There are following four navigation keys in Accpac:

First, Previous, Next and Last
First: To go to the first record from the finder list
Previous: To go to the Previous record from the finder list
Next: To go to the Next record from the finder list
Last: To go to the Last record from the finder list


CREATE RECURRING ENTRIES IN GL


Recurring Entries in GL is used to set up journal entries for transactions that occur on a periodic basis. Setting up a recurring entry is similar to recording a journal entry, except that the Recurring Entry form contains additional fields for identification.

To Setup Recurring Entries:
1.       In the GL Setup folder, click Recurring Entries icon
2.       In the entry screen, enter the unique recurring entry code which should represent the type of entry created; maximum 16 characters.
3.       In the Entry description field, enter the suitable description e.g. ‘Recurring batch for Nov 2012 Salary Liability.’
4.       In the schedule field, select the schedule an appropriate schedule such as Monthly.
The scheduling defines the frequency and the day on which the recurring transactions will be         processed.
5.       In the start date field, enter the first processing date for the entry e.g. ‘10/19/2012’.
6.       In the Expiration type, there are two options:
1.       No Expiration date
2.       Specific date
If you select Specific date, you must specify an expiration date in the field that appears.
When an expiration date is specified, the entry is included in the recurring entry batch only if the expiration date is later than the run date.
7.       The Last Run Date field displays the last date this entry was included in the recurring batch.
8.       The Last maintained field displays the last date when this record was changed.
9.       In the description, enter the description for the recurring entry e.g. ‘Recurring batch for Nov 2012 Salary Liability for Greytrix Employees.’
10.   Complete the remaining fields the same way a typical journal entry is created.
Create Recurring Entries Batch:
Select the Create Recurring Entries Batch icon from GL Periodic Processing. The Create Recurring Entries Batch form appears:

1.       Enter a date in the Run Date field if the recurring entries are being created manually in the Create Recurring Entries Batch form. The run date determines which recurring entries are due to be processed. It includes all entries up to the date specified.
2.       Enter the From and To Recurring Entry Codes. For e.g. ‘If a new batch is to be created for salary to Greytrix employees for the month of November, then the code that is already created as a recurring entry for the monthly salary should be selected in the From and To criteria.’
3.       The selection criteria Method has the following three options:
1.       Default - When this method is selected, the batch will be appended to an open batch if both batches have the same run date; otherwise, a new batch is created.
2.       Create a new batch – When this method is selected, a new batch is created.
3.       Add to an existing batch - When this method is selected, a Finder field appears. Click the Finder to select an existing open batch to add this batch to
4.       Run Process.

After creating a recurring entry batch:
• Print the Batch Listing and, if necessary, edit the batch using the Journal Entry form.
• Post the recurring entry batch.
                                                                                                                                                      

Thursday, October 11, 2012

Exporting Data to Excel


The best approach to work with Export in Accpac is by entering a sample transaction directly via the user interface (UI) and then exporting it using Accpac Export in the format you require, such as Excel or CSV or ODBC. The exported file can then be used to prepare your data for import.
Data can be exported for all the masters, setups.
To Export the data from Accpac go to the required screen and following path:
File optionsà Export


Once clicked on Export, it will open a new screen where the user has to select the type of file format in which data should be exported.

Also select the File Location path where the exported file will be saved. Once the path is selected, it displays the various detail sheets that will be exported.

There are several features available while exporting the data as mentioned below:
Ø  The user can export only required columns in the sheet by selecting them. This would help to reduce the file size.


Ø  There is a Set Criteria feature, where the user can set the various criteria’s for export
For Ex, If the user wants to export only some specific data from the system say, if there are Stock and non stock items imported in the system but if it is required to export only the stock item, then click Set criteria, select stock item column from columns dropdown, click on Add, it will be added in the field criteria column, click on the first cell, a dropdown will appear, select Yes from dropdown, click Ok and export. This would export only the stock items in the sheet.
The same procedure applies for other column criteria.

Ø  There is a Save Script option which allows saving the Set criteria script at a specific location, so that the next time when the user wants to export the sheet with the same set criteria, the script can be loaded from the path where it was saved using the Load Script button.


Friday, September 28, 2012

Sage Software for Non Profit Organisations (NPO)


Greytrix with Sage software introduces Sage EES for NON Profit Organisations which includes a seamless integration between Sage 300 ERP and Sage CRM.
Non-Profit Organisation (NPO) is an organization that uses surplus revenues to achieve its goals rather than distributing them as profit or dividends. In India, NPOs are known commonly as Non-Governmental Organizations (NGOs). 
Sage has been serving non-profit and governmental organizations throughout North America for more than 30 years. The company currently helps more than 32,000 unique not-for-profit organizations increase efficiency and more easily manage their operations through the use of technology. From fund accounting, donor and fundraising management, and grant management, to online donation processing, human resources (HR), payroll, and fixed asset management, Sage Non -Profit Solutions, offers a software product or service to meet the organization’s need.
In India, Greytrix a leading Sage Partner based out in Mumbai and Delhi, have used Sage 300 ERP and Sage CRM two of Sage’s hot selling business applications to establish the Sage EES i.e. Sage Extended enterprise Suite for Non-Profit Organization.  Since both applications form a tight integration with each other a transparent road is formed between the operations and finances serving the exact motto of a NPO.
NPO such as research foundations, child care foundations, charities, etc. can benefit from the solution to know how contact Greytrix India Pvt Ltd at sales@greytrix.com

Tuesday, September 11, 2012

Using BOM and Assembly to Convert Items in Sage Accpac aka 300 ERP


The other day we were discussing Sage 300 for a prospect in Fabric industry and came across a requirement where they needed to convert a roll of fabric into multiple pieces. The simple solution provided was to have more than 1 UOM (Units of Measure) defined for the same item and then based on the conversion unit transact the item in both the units Roll and Pieces. However, they insisted on maintaining the item separately for Roll and Pieces. Now this situation can be handled using the BOM and Assembly functions of Accpac aka Sage 300.
Listing down the steps on how to define BOM (Bill of Material) and then assemble an item (Raw Material) to form finished good.
Go to Inventory Control Module and select Bills of Material under I/C Items and Price Lists. Select the Master Item as the item to be prepared as the finished good, which in this case will be Fabric Pieces. Assign a BOM number, Fixed and Variable costs that can incur in the conversion of roll into pieces. Fill in the build quantity as the no. of pieces that can be made using 1 unit quantity of roll (e.g. 10 pieces of 1 meter each if the roll is of 10 meters.). Select the Component item as Roll, enter the Unit Quantity (e.g. 10 Meter) and then save this BOM.
Now whenever a conversion is to be done, go to I/C Transactions> Assemblies and select the Master Item number, Location and Build Quantity and then run the assembly. This will convert 1 roll of fabric (say 10 meters) into 10 Pieces of fabric (say 1 meter each).
The benefit of using this process is that you can program the system to take care of the costing of cut-pieces based on the cost occurred in procuring the role.
On top of this, you can also record the loss of fabric due to the cutting process involved by entering the actual quantity in build quantity. (e.g. 1 roll converts into 9.7 pieces – provided you have allow fractional quantities checkbox on) and also if there are any fixed or variable costs involved in the process, they are taken care of.
This process will help you keep a more detailed track of stock that you own in different UOM and also automate to add the conversion costs and wastages to finished goods.
Hope this helps. Keep visiting for more.

Monday, July 23, 2012

Meet the new face of Sage ACCPAC ERP, Sage 300 ERP


Sage Software is undergoing re-branding as it approaches the 31st year of providing market leading business solutions provider to small and medium businesses across various geographies.
In 2012 the names of many of our Sage products accounting and ERP lines, including those designed for nonprofits and the construction industry, are changing. These products will be identified with a numbering approach where higher numbers denote increasing levels of product capability or sophistication. Our product numbering sets include Sage One, Sage 50, Sage 100, Sage 300, and Sage 500. Thus our good old friend Sage ACCPAC ERP gets a new makeover and a new name, Sage 300 ERP.
Sage 300 ERP is now currently in version 6.0 and the editions 100,200 and 500 will be called Standard, Advance and Premium respectively. ACCPAC is just getting a new name, rest it is still as efficient, robust, user friendly and cost effective as ever.
Read more for the various add-ons and customizations on Sage ACCPAC ERP, correction, Sage 300 ERP.
Even you will get the hang of it soon.
Keep Reading.

Friday, July 13, 2012

New release of Greytrix Document Attachment for Sage 300 ERP


We are glad to announce new release (with a complete makeover) of our Greytrix Document Attachment solution for Sage (Accpac) 300 ERP v5.6 & 6.0.
Lets see its features and whats new.
Product Features:
* Allows you to attach scanned documents/reports/Fax/images to almost all the transaction screens in Accpac like Order Entry/ AR Invoices/ AP Invoice/ Purchase Order/ PO Invoice/ Adjustments/GL Transactions.
* Using this product  user can now keep a track of Original Sales Orders/ Purchase Orders/ Amendments done to the  Orders/ Revised Orders
* Using this product user can attach documents to the AP/AR Adjustment Entries which have been passed and posted with a manual approval of an authorized person on Paper.
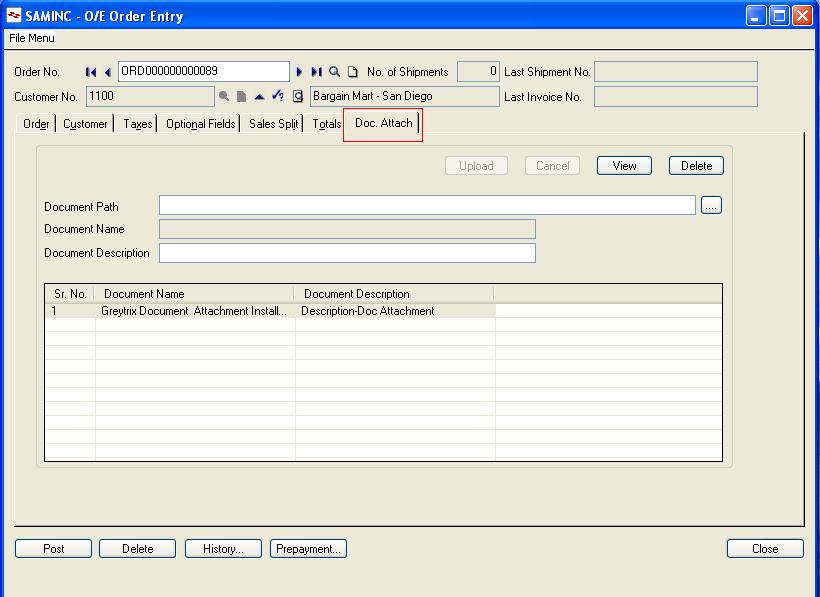
* Below is the screen shot of O/E Order Entry screen with document attachment tab, where user has selected one text file .
Document attachment functionality is provided on the following screens. [Can be added to others if needed]
  • AP – Invoice Entry, Adjustment Entry, Payment Entry
  • AR – Invoice Entry, Receipt Entry, Adjustment Entry
  • GL – Journal Entry
  • OE – Invoice Entry, Order Entry
  • PO – Invoice Entry, PO Order Entry
Now lets see Whats New
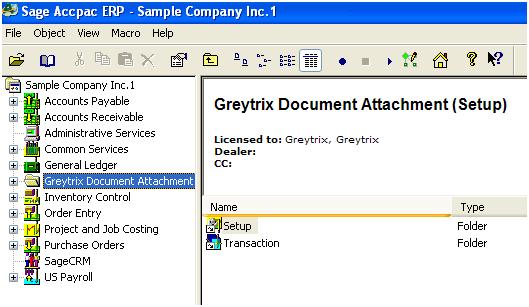
1. This version of Document Attachment product is now released as a Module (registered with Sage), so that standard Accpac transaction UI is not disturbed and patch updates don’t affect the product and the system. It is compatible with Sage (Accpac) 300 ERP v5.6 and 6.0.
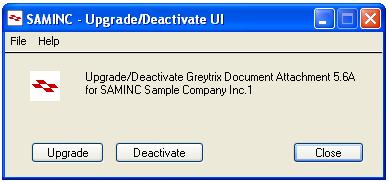
2. Ability to activate or deactivate Doc Attach module per company. (As shown in below screen shot)
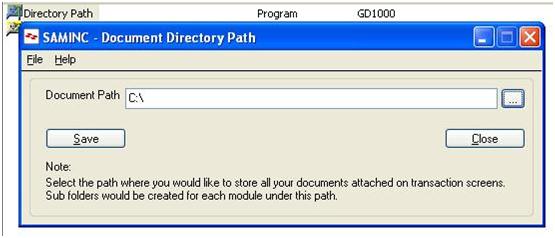
3. Now you can configure UNC filename path in the new Setup Screen and no need to maintain Document Attachment.ini file. (refer the screen shot)
4. Doc. Attach functionality extended on following screens [Can be added to others if needed]
  • AP – Invoice Batch List, Adjustment Batch List, Payment Batch List
  • AR – Invoice Batch List, Receipt Batch List, Adjustment Batch List
  • GL – Batch List
  • OE – Shipment Entry
  • PO – Receipt Entry
5. You can now attach documents to historic transactions in Accpac (already posted transactions).