Pratham Filters, a filtration company chose Sage EES, which integrates Sage ACCPAC ERP and Sage CRM new system which was implemented by Greytrix, Sage's implementation partner. Aside from the Sage EES solution suite, Greytrix also deployed Greytrix TDS, which caters to the taxation needs based on set Indian standards and policies.Read more about the successful implementation of Sage EES across Pratham Filters
Friday, July 13, 2012
Greytrix's first step towards Hospitality industry
Here is the story about how Mumbai’s Greytrix went the extra
mile, in a seemingly simple set up and gave Goa’s Alila Hotels the right fit.
Alila was in search of an ERP application coming from a
well-reputed international vendor and one which could integrate seamlessly with
the existing front-end property management software and help us maintain
inventory, payables, and receivables as well as send automatic reports in desired
formats to our head office.
The new ERP has enabled Alila to control their inventory,
collection as well as given them performance indicators on a real-time basis.
At any time, on click of a button, the client has access to MIS reporting,
inventory position to avoid stock outs and overstocking, generate outstanding
receivable aging for collection, as well as customer statements. The new ERP
gives the hotel an easy way to integrate data coming from various departments
and come up with a unified report that can be sent to its headquarters in
Singapore.
For more information, please visit: http://www.channelworld.in/case-study/greytrix-implements-erp-alila-hotels
Tuesday, July 3, 2012
Clearing the Deposit one by one in Bank Reco even though we have entered multiple entries in one batch of AR Receipt.
In Sage Accpac 6.0-500 it is not possible to clear the
individual entries in Bank Reco.
Consider a case where you have entered 5 receipt entries
in one batch then in such cases we have to clear the entire amount at once in
Bank Reco. Accpac does not allow clearing of individual receipt one by one in
Bank Reco. screen but after the release of Product Update 1 for Accpac 6.0 they
have recovered from this bug and provided a way to clear the entries
individually.
Following is the process for the same.
Process:
1.
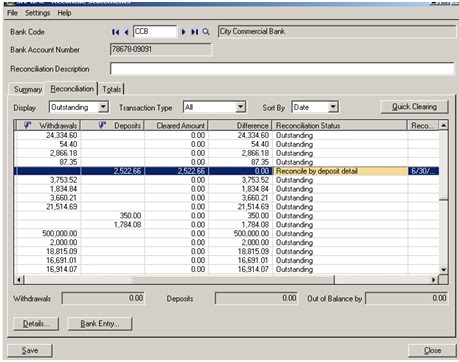
Go to the Bank Reconcile Statement Screen.

2.
In the above Screen shot I have highlighted one
entry of a deposit of amount 2522.66. The entry contains two AR receipts one of
amount 2171.08 and other of amount 351.58. By default the status of the entry
is outstanding as shown below.

3.
As this amount consists of two different
amounts, we need to clear only one amount out of two. Thus here you need to
change the status ‘Outstanding’ to ‘Reconcile by deposit detail’ as shown in
the following two figures.
Own
below

4.
After changing the status of the line click on
the Detail button which lying at the bottom of the screen as shown below.
5.
After clicking on the detail button the
following screen will open.

6.
As shown above the highlighted area contains the
total amount which consists of two entries which are reflecting in the grid
below.
7.
Now consider a case where we want to clear only
the first entry. Thus in this case we will enter only the amount that we want
to clear in the highlighted area as shown below.
8.
In the below figure you will notice that the
cleared amount at the top has been change to 2171.08 and then we have change
the status of that individual entry from outstanding to Cleared.
9.
After changing the status click on the save
button and close the screen.

10.
After closing the screen, you will get the
following display which will show you a difference of 351.58 which is yet to be
cleared. And which you can clear later according to your requirements.

11.
In this way you can clear the individual receipt
entries in the bank Reco even though you have entered multiple entries in
single batch in AR Receipt Batch.
Friday, June 22, 2012
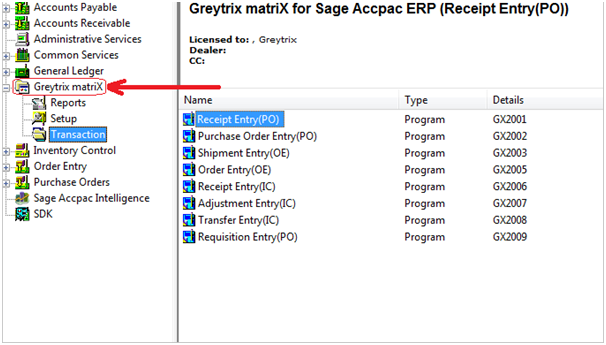
Greymatrix – Apparel Solution for Sage Accpac ERP
Greymatrix is a grid
inventory system that offers Apparel Retailers with a user friendly interface
to maintain transact and analyze their large inventory distributed by style,
colour and size. Seamlessly integrated with Sage (Accpac) 300 ERP, GreyMatrix helps
the garment and shoe merchants to obtain a 360 view of their inventory,
operations and finance and provide detailed retail analytics and business
intelligence.
Overview: Below screen shot shows the GreyMatrix module in
the Sage (Accpac) 300 ERP

Features:
Comprehensive solution with integrated Finance, Operations and
Inventory modules.
·
Capture unlimited Style,
Color, Size and Images.
·
Simplified Data entry
during Procurement, Sales and Distribution.
·
Integrated with Special
Localized Taxations.
·
Reduce pilferages in
stock at SKU level.
·
Exclusive Style master
for item generation.
·
Option to generate
Generic Reports along with Style images.
In our next blog we will
show how the Setup and Transactions works.
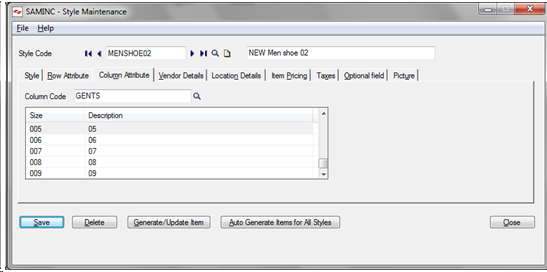
How to generate Styles in Greymatrix for Sage 300
In our last blog, we discussed about how to setup GreyMatrix
for your Sage (Accpac)
300 ERP system.
Today, we will discuss about how to generate the items for a
particular style. As now we are aware that Style is based on 3 important
parameters i.e. Color, Size and Style. Thus our Style maintenance generates
different items based on the combination of all the Colors and Sizes selected
against the style.

Let us brief out the functionality of the style master screen;
this function is similar to item master screen, the only difference is that, we
create the style for maintaining the items, color and size wise.
As the need of the Apparel is to allow the user to enter different
colors and sizes at a single point of time, Greytrix Apparel creates a 2 X 2
matrix where the Color = Row Attribute and Size = Column Attribute.


Now as we have already selected the Color and Size, we need to set
the vendor detail and location detail for the Style.
Similar to the item master we can also assign the optional
fields (If required) and taxes in respective tab. You can add the picture in
the picture tab so that you could keep track on the style easily.
After entering all the details in respective tab we are
ready to create a style, click on save to save the details and to click on Generate/Update button to create the Items with the combination of all colours and
sizes.

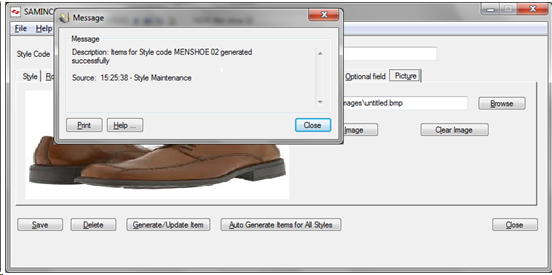
After generating the items from the style master, you could
find the list of items which are generated based on the combination of Style code, Color and Size.
I.e. if we have 3 colors and 5 sizes of particular style, we will have 15 total
items in the IC item table. All these items generated are having same
configuration as selected in the Style.
If user wants to modify the style, he /she can modify the style and
then need to click on save and Generate/Update button to update it in the item
master.
We also have a short video which summarizes this process.
Saturday, June 16, 2012
Database Profiles table error on Sage 300 Workstation
You come across Database profiles table error while opening the database Setup utility on a Sage (Accpac) 300 ERP workstation. It may persist even after you assign all Read\Write rights to the system and windows user on Sage Accpac folder in installation directory.

This type of error occurs due to invalid path of Programs and Shared data while installing Accpac Workstation on another machine. Suppose we have installed Sage Accpac Server on one system having IP as 192.168.0.56 with installation directory path for Sage Accpac as
Programs C:\Program Files\Sage\Sage Accpac6.0
Shared data C:\Program Files\Sage\Sage Accpac6.0\Data
Shared data C:\Program Files\Sage\Sage Accpac6.0\Data
Subsequently, we assign necessary rights to user of the workstation machine from the server where Sage Accpac in installed, as shown in the screenshot below.


Usually, we consider this type of issue is due to inadequate rights and that’s correct. However there may be some other cause ahead of this which can result in the above error. You may follow the below procedure to overcome this.
1. As mentioned above, firstly cross check if rights have been assigned on Sage Accpac Server machine to the windows user where Sage Accpac workstation has been installed (refer the above screen shot).
2. Then, on the workstation machine go to Start>>Run>>Type ‘regedit’ and press enter. A registry editor screen will be opened.
3. In registry Editor Page Go to My Computer >> HKEY_LOCAL_MACHINE >> Software>> Accpac International, Inc >> Accpac >> Configuration.

As in above screenshot, the path for Shared data is given as ‘\\192.168.0.56\Sage Accpac 6.0’ wherein 192.168.0.56 is the IP of Accpac Server machine and rest is shared directory of Sage Accpac on Sage Accpac Server machine. But on Sage Accpac Server machine, we had put the directory path as ‘Sage Accpac6.0\Data’ which is different from the path mentioned in the above screenshot.
4. Now click on Highlighted Shared data. It will show you certain options. You may select ‘Modify’ option to make the changes.
5. Once we click on ‘Modify’ the Edit String screen will appear. It will allow you to change the path of the Shared Data in Value Data Field. Now put the path as given in below screenshot.

6. After following the above steps, Go to Start menu and open Sage Accpac>>database Setup. Now the Sage Accpac database setup screen should open without any issue.
In this way, we can operate Database Setup on Sage (Accpac) 300 ERP workstation.
Friday, June 8, 2012
Customer Number Merge in Sage 300 ERP
In our earlier blog we discussed about the Customer Number
change feature, now lets see how customer number merge works in Sage (Accpac)
300 ERP in a similar situation like migration.
We will now see the ‘Combine’ option under the Customer Number
Change utility found in the AR module. The ‘Combine’ option allows two or
more Customers to be combined or we can say ‘merged’ into a single target
Customer. The target must be a customer existing in Sage (Accpac) 300 ERP .
Customers are not created during the Combine process. The entire source
Customer’s data records, including account balances, history and transactions
will be merged into the existing or target Customer’s account. The source
Customer Number is then permanently removed from the Sage ERP Accpac system.

Let’s look at an example as shown in screenshot in which the
client wanted to keep single Customer say ‘ESSAY INFOTECH’ from two customers
from his source ERP which are ‘ESSAY SOFTAWARES and ‘ESSAY INFOTECH’. So we
would follow the below procedure to merge the customer code ‘5001’ into ‘5002’
1. Choose combine option from the action box on the new window.
2. In the Combine box, choose the customer number which you wish
to combine into the final or target Customer Number. This can be done by typing
in the Customer Number, moving through the list of Customer Numbers using the
Up and Down Arrow keys, or choosing on the List Button and selecting the
Customer Number. Here we have selected customer code ‘5001’. Once the Customer
Number has been chosen, the corresponding Short Name and Customer Name are
displayed in the appropriate fields.
3. In the ‘In To’ box, type/ select the target Customer Number,
that should consist of the combined information. Here we have selected Customer
code ‘5002’. Also, within the ‘In To’ box the displayed Short Name and Customer
Name can be edited if so required.
4. Once you are satisfied with the information, choose the OK
button to add this entry to the Change List. Choose Cancel to discard the
current change entry.
Thus, we can merge or combine two or more customers into one
Customer for Sage (Accpac) 300 ERP . These and other helpful features make Sage
(Accpac) 300 ERP a preferred ERP by small and medium sized businesses to
migrate.
Subscribe to:
Posts (Atom)

